|
T. Andrew Yang
|
last updated: 7/14/2012: added lab 6 7/12/2012: added lab 5 7/11/2012:
added bonus exercise 4.6.2 7/3/2012:
updated percentage in Lab 3 6/17/2012:
Clarification of lab 2 (2.2) 6/3/2012: first published |
|||||||||||||||||||||||||||||||||||||||||||||||||||||||||||||||||||||||||||||||||||||||||||||||||
|
Total points= 100 1.1.
(10 pts)
Visit the
class discussion group (see the syllabus for the URL) and complete the
following tasks: 1.1.1.
Configure
your membership settings, so each email sent to the group will be forwarded to
your preferred email address. 1.1.2.
Post a message with your full name as the subject line. In your
post, briefly introduce yourself (including your full name) and one item you
most desire to learn in this class. 1.1.3.
Throughout
this class, you shall regularly visit the discussion group to find recent
announcements and reminders, and to participate at discussions. 1.2.
Java Development Environments: JDK 1.2.1.
Figure 1
shows a sample Java application. 1.2.2. Required
sections in your program Please note that all programs that you develop for this class should
have the following sections:
The program’s name
The author’s name (that’s you)
The date the program was written
A brief description of the purpose of that
program
The compilation and execution commands
Proper formatting including consistent
indentations and appropriate comments
Note: See
exercise 1.3 (below) for more information about the Java code conventions.
1.2.3. To download the source program as shown in Figure 1,
click this link.
Figure 1. A sample Java application
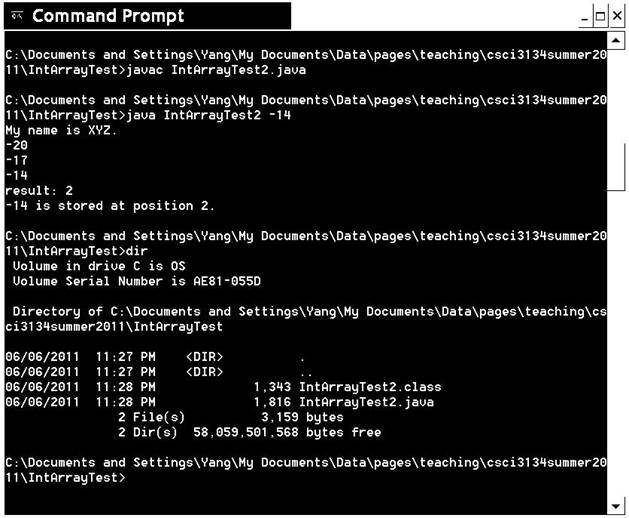
1.2.4. Figure 2 is a screen snapshot that shows commands used
to compile and execute the program, and the sample output produced by the
program. |
||||||||||||||||||||||||||||||||||||||||||||||||||||||||||||||||||||||||||||||||||||||||||||||||||
|
public
class IntArrayTest {
// attributes
private final int SIZE = 10;
private int A[] = new int [SIZE]; private
int CurrentPosition = 0;
// methods
public int size ( ) {
return SIZE;
} //size public
void add (int value) { A[CurrentPosition++]
= value;
} //add( ) public
int search (int key) { for
(int i=0; i< A.length; i++) { System.out.println (A[i]); if
(A[i] == key) return i;
} //for return
-1; //not found }
//search( )
// main( )
public static void main (String args[] ) {
IntArrayTest ar = new IntArrayTest ( ); for
(int i=0 ; i < ar.size( ); i++) { ar.add(2*i
+ i - 20); }
int Key = Integer.parseInt(args[0]);
//the value to search for, input from command line int
result = ar.search (Key); System.out.println
("result: " + result); if
(result == -1)
System.out.println (Key + " is not in the array.");
else
System.out.println (Key + " is stored at position " + result +
".");
} }
// IntArrayTest class |
Figure 3. A sample Java program (with improper code
conventions)
1.3.3. To hand
in:
1.3.3.1. (10 pts) The revised program
1.3.3.2. (10 pts) Select at least ten of the revisions you
have made, and explain each of those revisions by quoting the code
convention(s) you used for that revision.
1.3.3.3. (20 pts) Give the TA a face-to-face demo during his/her
office hours by showing how you’d run the revised program using JDK.
Go to the Index
Total points= 100
2.1.
Numbering
Systems
2.1.1. What is the decimal value of each of the following binary
or hexadecimal numbers? Note: You may use a calculator to verify your
answers, but be sure to show the intermediate steps that you used to derive
the answer.
2.1.1.1. (2 pts) 111011000b
2.1.1.2. (2 pts) ABCDh
2.1.2. What are the binary equivalents of the following
decimal or hexadecimal numbers? Show the intermediate steps that you used to
derive the answer.
2.1.2.1. (2 pts) 220500d
2.1.2.2. (2 pts) EA2Ch
2.1.3. What are the hexadecimal equivalents of the
following decimal or binary numbers? Show the intermediate steps that you
used to derive the answer.
2.1.3.1. (2 pts) 7654321d
2.2.
Programming
Projects: The following tasks involve modifications of IntArrayTest2.java (as
shown in Figure 1).
2.2.1. Add a method called sum( ) that, when called, returns the sum of all the elements in the
array. Make necessary changes in the main( ) method to test this new method.
Verify the returned value to be sure it is correct.
2.2.1.1. (15 pts) Program Design: Draw a flow chart to show
the flow of operations in your program. Use Microsoft Word, Visio, or any
computer-based tool) to draw the chart. Note: The
required flowchart is for the sum( ) method, not the main( ) method.
2.2.1.2. (15 pts) Program Implementation: Include the revised Java source program.
Note: Refer to the ‘Required
sections in your program’ above when writing your source program.
Missing section or inappropriate identifiers will reduce your earned grade.
2.2.1.3. (15 pts) Program Verification: Compile and run your program using JDK and verify
that the program behaves correctly. Attach three screen snapshots of
testing your program. Give the
TA a face-to-face demo during his/her office hours by showing how you’d
run your program using JDK.
2.2.2. Add a method called reverseElements( ) that, when called, reverses the elements in
the array. Make necessary changes in the main( ) method to test this new
method. Verify the result to ensure the elements are indeed reversed.
2.2.2.1. (15 pts) Program Design: Draw a flow chart to show
the flow of operations in your program. Use Microsoft Word, Visio, or any
computer-based tool) to draw the chart. Note: The
required flowchart is for the reverseElements( ) method, not the main( )
method.
2.2.2.2. (15 pts) Program Implementation: Include the revised Java source program.
Note: Refer to the ‘Required
sections in your program’ above when writing your source program.
Missing section or inappropriate identifiers will reduce your earned grade.
2.2.2.3. (15 pts) Program Verification: Compile and run your program using JDK and verify
that the program behaves correctly. Attach three screen snapshots of
testing your program. Give the
TA a face-to-face demo during his/her office hours by showing how you’d
run your program using JDK.
Go to the Index
Total points= 100
3.1.
(10 pts) A
class called Person is defined in
Figure 3.1. Draw a UML class diagram (using Microsoft Word, Visio, or any
computer-based tool) to model the Person class.
|
public class Person { private String firstName; private String lastName; private int age; public String getFirstName( ) { return firstName; } public void setFirstName(String firstName) { this.firstName =
firstName; } public String getLastName( ) { return lastName; } public void setLastName(String lastName) { this.lastName = lastName; } public int getAge( ) { return age; } public void setAge(int age) { this.age = age; } } //class: Person |
Figure 3.1: The class definition of Person
(Click this
link to download the Java source file.)
3.2.
Class Student: Revise the UML class diagram
you have derived from the exercise above to create a new class called Student, which represents a student
in a school.
3.2.1. (15 pts) Class
Design: Each student has the following attributes: firstName, lastName,
middleName, dateOfBirth, idNumber, address, and gpa (grade point average).
Define the typical set and get methods for each of these
attributes.
3.2.2. (10 pts) Class Implementation: Implement the Student
class using Java by defining the Student.java
source file.
3.2.3. (20 pts) Driver Class:
Define a driver class called StudentTest
to test drive the Student class. In
the driver class, create two students: John Peter Doe and Jane Chong Wu. Use
appropriate set methods to set the
value of each of the instance variables. Use appropriate get methods to retrieve the values of a student. Display both
students’ information on the screen. Give the TA a face-to-face demo during his/her office
hours by showing how you’d run your program using JDK.
3.3.
(15 pts) Draw a class diagram for the class called Course that has the following
attributes: courseName (of type String), semester (fall, spring, summer),
year, creditHours, and earnedGrade (A, B, C, etc.) Add corresponding set and get methods for the attributes.
3.4.
(15 pts) Draw a class diagram for the class called Transcript that has the following
attributes: owner (of type Student)
and an array of courses taken by the student (of type Course). Add corresponding set
and get methods for the
attributes. Add an additional method called calculateGPA( ), which calculate the given student’s GPA
using the grades earned in all of the completed courses.
3.5.
(15 pts) Draw a UML class diagram that includes all three
classes: Student, Course, and Transcript. Show appropriate association
between the classes. Note: A student may have completed zero or more courses;
a transcript is owned by one and only one student.
Go to the Index
Total points= 100, plus bonus
points
4.1.
NetBeans IDE
An integrated development environment (IDE) such as
NetBeans provides additional functions for a programmer to develop software
applications. As shown in Figure 4.1, NetBeans provides various options for a
programmer to create a Java application. In this class, you shall learn to
become familiar with at least two of those options:
1) To create a Java application from the scratch (by
choosing the ‘Java Application’ option when creating a new
project);
2) To create a Java application using existing source
programs (by choosing the ‘Java Project with Existing Sources’
option.
To learn about NetBeans, take either (or both) of
the following tutorials:
http://netbeans.org/kb/docs/java/quickstart.html http://java.sun.com/developer/onlineTraining/tools/netbeans_part1/
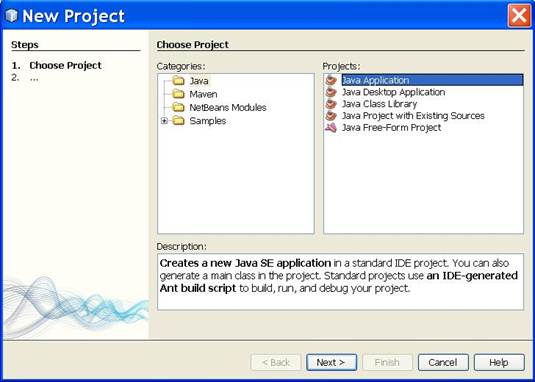
Figure 4.1: NetBeans provides various options for a
programmer to create a Java application
4.1.1. (10 pts) Use
NetBeans to create a Java application from the scratch (option a above). The
application should print a message like “"Hello! This is
XYZ.” Replace XYZ by your full name. Give the TA a demo to show
that you can do this. Your output screen should look like Figure 4.2.
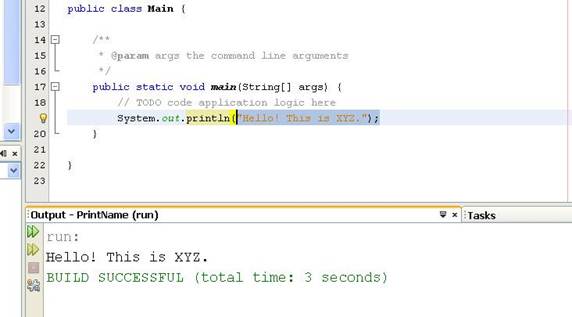
Figure 4.2: Running a sample application in NetBeans
4.1.2. (10
pts) Download or save the program for Exercise 4.6 (from the
textbook) into a file. Use option b above (create a Java application using
existing source programs) to run that program as a Java application.
Revise the program a bit so the output will
look like the one below (a greeting with your full name + a more detailed
message before printing the sum).
Give the TA a demo. Note:
Do not create the program from the scratch. You may save the file into a new
sub-folder.
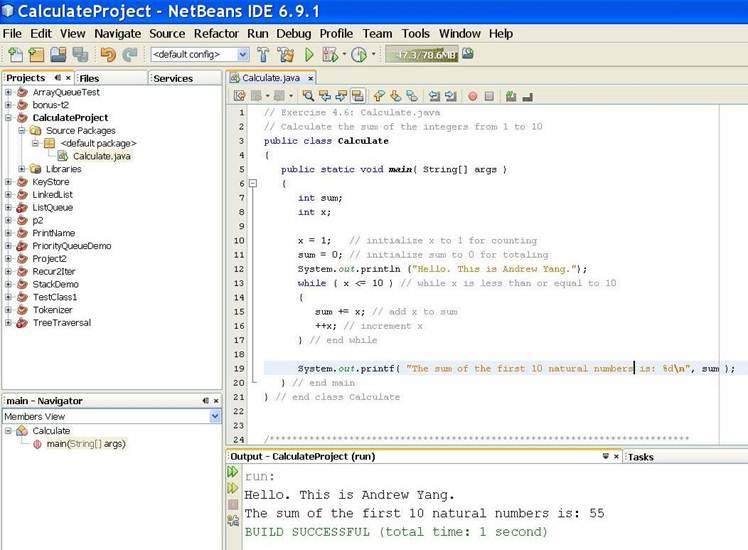
Figure 4.3: Running the Calculate application in NetBeans
4.2.
Implementation of the classes as defined in 3.5
above
4.2.1. (30 pts) Implement the classes defined in 3.5 (Student, Course, Transcript) using
Java by defining the respective source files. Save the source files into the
same folder.
4.2.2. (15 pts) Define a driver class called StudentTest to test the defined classes.
In the driver
class, create two Students: John Peter Doe and Jane Chong Wu. Use appropriate
set methods to set the value of
each of the instance variables. Use appropriate get methods to retrieve the values of a Student.
Create the
following transcripts for the students.
John’s
transcript:
|
Owner |
<a reference to
John> |
|||
|
GPA |
3.5 |
|||
|
courseName |
semester |
year |
creditHours |
earnedGrade |
|
csci3134 |
Spring |
2011 |
3 |
B |
|
csci3333 |
Fall |
2011 |
3 |
A |
John’s
GPA = (3 x 3 + 4 x 3) / (3 + 3) = 3.5
Jane’s
transcript:
|
Owner |
<a reference to
Jane> |
|||
|
GPA |
3.7 |
|||
|
courseName |
semester |
year |
creditHours |
earnedGrade |
|
csci3134 |
Spring |
2011 |
3 |
A |
|
csci3333 |
Fall |
2011 |
3 |
B |
|
math3333 |
Fall |
2011 |
4 |
A |
Jane’s
GPA = (4 x 3 + 3 x 3 + 4 x 4) / (3 + 3 + 4) = 3.7
For each of the students,
display the following information on the screen: student ID, student name,
student address, GPA, and the list of completed courses (name, semester,
year, credit hours, grade).
4.2.3. (15 pts) Verification: Test the program to ensure it works correctly. Give the TA a face-to-face demo
during his/her office hours by showing how you’d run your program using
JDK or NetBeans.
4.3.
Static Methods
4.3.1. (15 pts) Rewrite the Calculate
program from 4.3 above by moving the
statements of calculating the sum of the first N natural numbers into a static method called calculateSum( ). As shown in the
method heading below, the method takes an integer upper, which represents a natural number, calculates the sum of 1
+ 2 + … + upper, and returns the sum as a long value to the calling
method. Attach the revised program.
long calculateSum (int upper)
4.3.2. (15 pts) Verification:
Test the program to ensure both methods work correctly. Give the TA a demo
of your working program.
4.4.
Bonus exercise (optional) Note: There will be no
partial credit for the bonus exercise; each bonus program must work
completely.
4.4.1. (30 pts) Repeat the exercise above, but this time define an instance method called calculateTotal( ), which performs the
same calculation as calculateSum( ).
Note: An instance method can only be “invoked” via an object. Attach
the revised program and give the TA a demo.
4.4.2.
(30 pts) Design
and implement a method called calculateGPA(
) as part of exercise 4.4. The method should be added as an instance
method into the Student or the Transcript class. When called, it
calculates the student’s GPA by multiplying appropriate weight (e.g., 4
for grade A, 3 for grade B) with the number of credit hours for the course,
summing the results up, and then divide it by the total number of credit
hours. For example, John’s GPA is calculated as (3 x 3 + 4 x 3) / (3 +
3) = 3.5, because John has earned a B (3 hours) and an A (3 hours). Attach
the revised program and give the TA a demo. ß New
Go to the Index
Total points=100
5.1.
In the
Oscillator application (available for download from http://sceweb.sce.uhcl.edu/yang/teaching/Oscillator/OscillatorDemo.htm,
copied below as Figure 5.1), the oscillate( ) method takes two input
parameters, firstN and secondN, and continually prints the
numbers in between the two numbers by alternating the sequence from low to
high and then high to low, until the user initiates a system break.
|
public
class Oscillator{ public static void oscillate
(int firstN, int secondN) { if (firstN >
secondN) { //swap them int
temp = firstN; firstN
= secondN; secondN
= temp; }
System.out.printf("\nOscillating between %d and %d
...\n\n", firstN, secondN); boolean up = true; while ( true ) {
//continue until a system break, say CTRL+C in Windows or the STOP button
in NetBeans if
(up) {
System.out.print("Upward\t"); printUpward
(firstN, secondN); up = false; pause (150000); }
else
{
System.out.print("Downward\t"); printDownward
(firstN, secondN); up = true; pause (150000); } } //while } //oscillate( ) private static void pause (int
tick) { //Use a nested loop to simulate a pause for ( ; tick >
0; tick--) { if
(tick % 10000 == 0) System.out.print("."); //show the progress for
( int temp = tick; temp > 0; temp--) for ( int temp2 = tick;
temp2 > 0; temp2--) ;
//do nothing; just pause } //for } //pause() private static void printUpward
(int firstN, int secondN) { for ( ; firstN
<= secondN; firstN++) System.out.printf
(" %d", firstN);
System.out.println(); } //printUpward() private static void
printDownward (int firstN, int secondN) { for ( ; secondN >= firstN; secondN--) System.out.printf
(" %d", secondN);
System.out.println(); } //printDownward() }
//class: Oscillator |
Figure 5.1
The Oscillator.java program
The purpose of this
exercise is to add another oscillate( ) method that takes three parameters
into the existing application. In addition to the two numbers, the third
parameter represents the number of cycles the method will oscillate through.
A printing sequence from low to high and then high to low is considered as a
single cycle. Sample output screen of running the revised program in NetBeans
is shown as Figure 5.2.
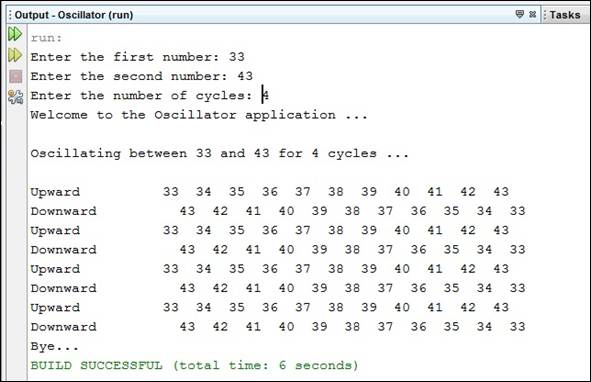
Figure 5.2
Sample output of running the revised oscillate( ) method
5.1.1. (20 pts) Implement the changes in the Main.java and the
Oscillator.java programs. . Attach the revised program.
5.1.2. (15 pts) Verification:
Test the program to ensure the revised programs work correctly. Give the
TA a demo of your working program.
5.2.
The
RollDie.java program from the book (Fig. 7-7) demonstrates the use of the
java.util.Random class. The Random class enables a Java program to generate
random numbers. A call like nextInt(6),
for example, returns a number between 0 and 5, and the returned number varies
each time.
Requirements: Take the Oscillator.java program in Figure 5.1 (or the revised
version from exercise 5.1) and revise it to take advantage of the Random
class. The sequence of numbers printed from firstN to secondN, for example,
will not always be incremented by 1. Instead, a random increment will be
performed for the next number. If the user enters 11 and 22 as the two
numbers, the printed sequence of numbers could be 11, 13, 14, 17, 18, 22 or
11, 15, 16, 21 or something else. The number 22 was not printed in the second
sequence because the next number to print is 23, which exceeds the value of
secondN.
To hand in:
5.2.1. (25 pts) Draw a flowchart to show your design of the revised
oscillate( ) method, which prints sequence of numbers between firstN and
secondN with random increments
between every two numbers.
5.2.2. (20 pts) Implement your design.
5.2.3. (20 pts) Verification:
Test the program to ensure the revised method works correctly. Give the TA
a demo of your working program.
Go to the Index
Total points=100
6.1.
Below is a
refined Person class from Figure
3.1.
|
public class Person { private String firstName; private String lastName; private int streetNumber; private String streetName; private String apartmentNumber; //optional private String City; private char
State[2]; private String zipCode; } |
6.1.1. (10 pts) Implement the Person class and add proper set and get methods.
6.1.2.
(10 pts) Extend
the Person class by creating a
subclass called Student. In
addition to attributes inherited from the Person class, the Student class has
got the following additional attributes. Implement the Student class and add
proper set and get methods.
|
//Additional attributes in the Student class String major; //The student’s major area
like ‘Computer Science’ or ‘English’ float gpa; //The student’s gpa boolean degreePlanInFile; //Whether the
student’s degree plan has been filed or not |
6.1.3. (10 pts) Define a driver class called StudentTest to test drive the defined classes. Declare an array
of students with the following data attributes. Add two methods in this
class. The method addStudent( ) takes
a student as a parameter, and add data attributes to the student. The method displayStudent( ) also takes a
student as a parameter, and display that student’s data on the screen.
|
attributes |
Student
1 |
Student
2 |
|
First name |
John |
Jane |
|
Last name |
Doe |
Doe |
|
Street number |
1234 |
2234 |
|
Street name |
Bay Area Blvd. |
Galveston Highway |
|
Apartment number |
n/a |
B200 |
|
City |
Clear Lake |
La Port |
|
State |
TX |
TX |
|
Zip code |
77058 |
77673 |
|
Major |
English |
Computer Science |
|
gpa |
3.52 |
3.89 |
|
Degree plan in file? |
Yes |
No |
6.1.4.
(20 pts) Verification:
Test the program to ensure the
revised method works correctly. Give the TA a demo of your working
program.
6.2.
This
exercise focuses on the creation of serializable
objects that can be saved into and retrieved from a binary file, using ObjectInputStream and ObjectOutputStream.
Note: This exercise is a continuation from exercise 6.1.
Completion of the first exercise is required before attempting this exercise.
6.2.1.
(5 pts)
Make necessary revisions to make the Student
class serializable. Note: You also need to make the
parent class of Student serializable.
6.2.2.
(10 pts)
Revise the CreateSequentialFile.java
Shown in Figure 6.1 is a screen shot of running a revised
version of the CreateSequentialFileTest program to create records of Student
(simplified version); the program takes id, first name, last name, major and
gpa for each of the students until the user enters <ctrl> z (in JDK) or
hits the STOP button (in NetBeans) to end the input. The user input is saved
into the file students.ser.
Note: Revise the program so it can handle the Student class as specified above in 6.1.
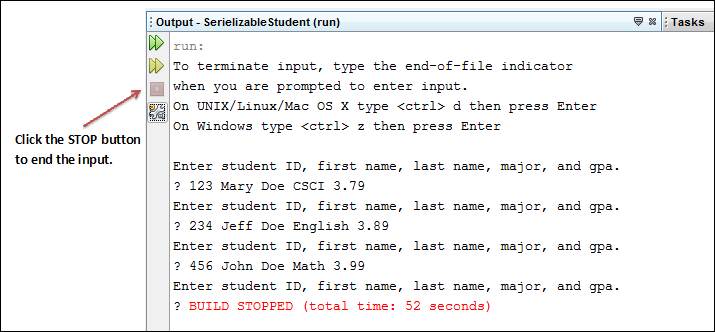
Figure 6.1: Creating the students.ser file to store the Student
objects
6.2.3.
(10 pts)
Run the CreateSequentialFileTest application using JDK or NetBeans to create
the students.ser file. Give the TA a demo of your working program.
6.2.4.
(10 pts)
Revise the ReadSequentialFile.java
As shown in Figure 6.2, the revised
program (simplified version) reads data stored in the file students.ser,
deserializes the objects, and then displays the data on the screen.
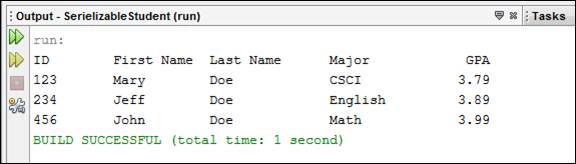
Figure 6.2: Reading data from the students.ser file to restore the
Student objects
6.2.5.
(5 pts) Add
into the ReadSequentialFile.java
6.2.6.
(10 pts)
Run the ReadSequentialFileTest application using JDK or NetBeans. Give the
TA a demo of your working program.
Go to the Index